DISCLAIMER: I DID THE FIRST PART OF THIS TUTORIAL AT HOME IN MY FREEZING COLD CRAFT ROOM WITHOUT THE SOFTWARE I HAVE AT WORK FOR CREATING NICE SCREENSHOTS. SO PLEASE FORGIVE THE NOT SO GREAT LOOKING FIRST PART.
When I first started using Evernote, I was totally intimidated! I had tried using MS One Note and had a horrible time with it! But Evernote is so simple and I am going to try to explain it to you here.
First, set up an account at Evernote.com, then download and install the FREE version of Evernote. Once you have it, you can access it from anywhere simply by going to Evernote.com and logging in to your account.
Installed Version: When you have it downloaded, click File and then select New Notebook from the menu.
![]()
Give your notebook a name. I called mine Stamp Set Inventory. When you have that done, click New Note.
![]()
Now give the note a title. I give mine the stamp set number and name.
![]()
![]()
![]()
![]()
![]()
![]()
![]()
![]()
![]()
![]()
When I first started using Evernote, I was totally intimidated! I had tried using MS One Note and had a horrible time with it! But Evernote is so simple and I am going to try to explain it to you here.
First, set up an account at Evernote.com, then download and install the FREE version of Evernote. Once you have it, you can access it from anywhere simply by going to Evernote.com and logging in to your account.


Now give the note a title. I give mine the stamp set number and name.

Next, add some tags. Tags are awesome when you want to find a particular stamp set later because it allows you to search using words instead of scrolling through all of your stamps you have entered. I have 426 stamp sets currently (and I think I have a few that have not been entered yet) so you can image the pain that would be! Click Add Tag... to enter those tags.

I simply used various items that are on this stamp set as the tags, such as candles, party hat, cake and birthday.

Next, open a Google browser (or Internet Explorer or Firefox, whichever you prefer - I am a Windows gal; sorry Mac users...) and search for the stamp set you want an image of. I enter CTMH followed by the stamp number, for example CTMH C1662.

Voila! Now click the right mouse button and select Copy Image then go back to your note and click the right mouse button again then click Paste to put it into your note. Then just close the note by clicking the X in the top right corner and you are done!
Online Version: When you access Evernote remotely (online via Evernote.com), it will look different than the one downloaded and installed on your computer. You add notes via the menu on the sidebar:
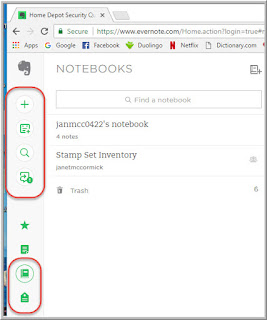
Select the Notebook you want to work with, or click Notebooks to start a new one. Click New Note (+ sign) to start a new note.
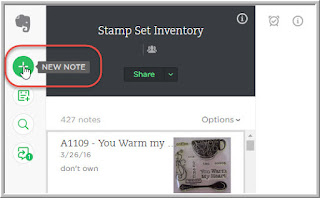
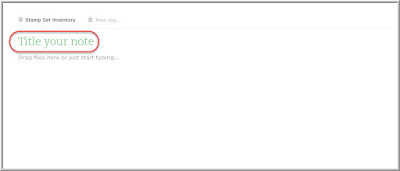
The new note will look quite a bit different to the installed version, but it works basically the same way. Enter the title of your stamp set as before, the click New Tag to add tags.
![]()

Start typing tags and hit Enter between each. This will start a new tag. Keep entering tags until you feel there are enough (don't go overboard!) then click in the main body of the note. For the Wise Guy Birthday stamp set, I entered words from the stamp set (Happy Birthday) as well as words evoked by the set (fun, happy, celebrate), and words to express the images as well (cake, party hat, candles...). By doing this, I have made it easier to find a stamp set that expresses the feeling I want.
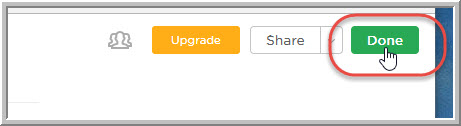
Add an image of the stamp using the same method as above. When you are finished, click Done in the top right corner and your note will be saved to your Notebook!
Now, when I want a particular stamp set, I click Search and type in what I am looking for.
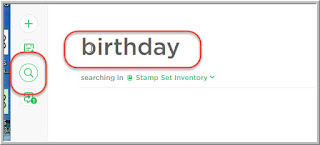
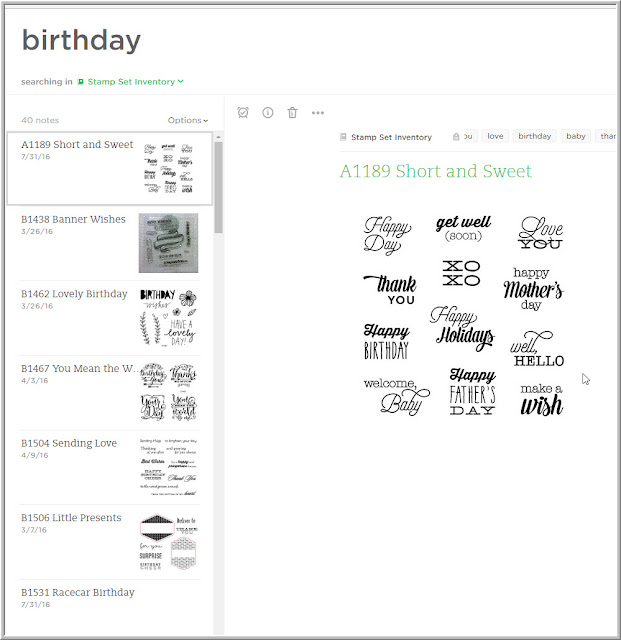
Evernote will list all of the stamp sets with the tag Birthday. At the top of the list, it shows it found 40 stamp sets with the tag Birthday. Now I can scroll through 40 a lot faster than 427 to find the one I want.
So that is all there is to it. If you have any questions, I will gladly help you out!